![]()
Shape Ski Article
|
|
Shape Ski Article |
| Back to the main ski page. | Rusty Carr is a PSIA certified level 2 ski instructor who teaches at Whitetail, PA. He took the Elan clinic for shape skis when Whitetail first acquired them in their rental fleet and taught shape ski specific lessons at Whitetail when shape skis were the new thing. Rusty's first shaped skis were Elan SCXs. |
The shape ski primer for skiers who have missed the
revolution.
If you have not been on snow skis in the last 10 years, you’ve missed the “shaped
ski” revolution. Maybe you’ve heard how much more fun skiing is these days
and you’ve decided to try it again. Welcome back! You’ve got some catching
up to do. Since 2000 almost every ski sold in ski shops has been a “shaped”
ski. By now most of the active skiers have already switched to the new
technology and adjusted their technique. If you’ve got an old pair of skis in
the closet, forget about them because 10 year old skis are even more useless
than a 10 year old PC. Buy, borrow or rent, but get yourself on new gear. Now
all you need to do is upgrade your technique. Most of you just need a few simple
tips and you’ll be having more fun than ever before. Read on and you will
discover the only 5 things you need to know about shaped skis, an introduction
to the “carving” phenomenon and some exercises that will teach you how to
get the most out of the new skis.
The five things you need to know about shaped skis are:
1) they are shorter,
2) they give you more feedback,
3) you need to use more edge and less steering,
4) you need a slightly wider stance,
5) you need to be more centered over your skis
Many skiers who have made the transition to shaped skis learned these things the
hard way, but it was not that hard. A few skiers who tried the new skis and did
not adjust their technique hated them. If you don’t make these adjustments,
you’re opinion of shaped skis will be “they suck”. If you do your homework
and get with the program, you’re in for more fun than you could possibly
imagine.
Go Shorter
If you skied on 200cm skis before the revolution, the equivalent shape ski is
170cm long. These shorter skis will support your weight because they are
stronger inside than old skis were. They’ll go just as fast (if not faster
than) as your old skis because you’re going to be carving your turns instead
of skidding them (more on that later). You’re not going to believe that skis
this short actually work, but they do. If you insist on “going long”, the
skis are going to be harder to turn and you’re going to miss out on half the
fun.
Listen to the Feedback
Shaped skis are “chatty”. They give you much more information via “feel”
then straight skis do. Shape skis will tell you when you are doing too much work
by “complaining”. If you steer too much, the tails will wash out. If your
skis are too flat for your speed, the ski tips will wobble. Experienced skiers
will recognize these feelings as symptoms of inferior skis. But unlike the
inferior skis of yesteryear, these feelings will disappear with a change in
technique. When you treat them right, shaped skis start speaking a different
language. When you let the skis steer themselves you will feel the skis say “I
can handle this”. When you master carving, you’ll hear “OYeah Baby! Let’s
Boogie!” as the G forces build.
More edge, less steering
Shaped skis have a shorter turning radius than straight skis. Their natural turn
is much closer to the size of turns that recreational skiers want to make. This
means you don’t have to force (i.e. skid) a straight ski to make it go where
you want to go. With straight skis, you had to do most of the steering. With
shaped skis, the shape of the ski does much more of the turning for you. Try
this experiment at home. Put a banana and a pencil on the kitchen table. Put
your finger behind the eraser on the pencil and push the pencil. It will go
mostly in a straight line, but it might wander off line a little. Now try the
banana. When you push along the axis of the bottom end of the banana, the banana
does not move in a straight line like the pencil. It turns by itself. All you
have to do to get shape skis to work like that banana is to get them on edge.
When you first start on shapes, it’s easiest to think about “tipping the
boots” or pushing your knees sideways to get the skis on higher edge angles.
As you get used to the self turning power of the skis and begin to trust them,
you’ll transition to getting the higher edge angles by moving your whole body
diagonally (forward and down the hill) into the new turn instead of just tipping the boots or knees.
It’s very hard for straight ski experts to not turn their feet to help the
skis through the turn. With shape skis, you still need to have this skill but
you need to use a lot less of it. Another difference with shape skis is that you
turn with the tips instead of the tails. Straight ski technique depended a lot
on vertical movement to unweight the skis to allow them to get turned (mostly by
moving the tails). Shaped ski technique replaces this with more side to side
movement to get the skis onto the edges. If you steer shape skis too much with
your feet, the tails will wash out and your turns will feel awful. As you get on
higher edge angles with shaped skis, your feet will get farther out away from
underneath the body in order to stay balanced. Shaped skis will turn and come
back underneath your body on their own whereas straight skis never would.
Wider stance
There is no right or wrong width between your feet in skiing, but
there are times when you should adjust your stance width to get the best
performance. For example, in powder and moguls, you want your feet a little
closer together. A long time ago, model parallel turns had your feet locked
together. With straight skis, the narrower distance between your feet made it
easier to unweight the skis and turn them. With shaped skis, you don’t need to
unweight the skis anymore so you should have your feet slightly wider apart than
what you were used to with shaped skis. You need the room for the higher edge
angles. Try the tug of war exercise to see how much more power a wider
stance/higher edge angle can give you. A wider stance will also give you better
balance to handle the higher “G” forces in carved turns. The faster you go
on higher edge angles, the wider you need to make your stance.
Stay centered
Everyone knows they should not sit back on their skis, but this tip
is a little counter intuitive. If you pressure the tips of a shape ski early in
the turn, it really accentuates the turning power of the skis. Then there’s
the old tip about maintaining shin contact with the front of the boot. If
everyone is saying “get forward” why do we now say get centered? First off,
the skis don’t need a lot of pressure for the tips to grab and pull you
through a turn. Second, you have better balance in the center, then when
forward. Staying with your weight centered over your arches or the balls of your
feet gives you just the right pressure on your ski tips versus pressing on your
toes or heels. You still need to maintain shin contact with the front of the
boot, but you don’t need to press hard. You’re still going to be moving your
weight forward and backward while you are skiing, but it’s going to be in a
smaller range than when you had straight skis.
You also need to stay more centered between the feet with respect to how you
stand on the skis. Old style racers used to lift the inside ski off the snow to
get all of their weight on the outside ski. With shaped skis, you get better
performance by having more weight on the inside ski than what you would have
needed on straight skis.
All skis have a “sweet spot” where they perform the best. When you have all
of your weight over the sweet spot all parts of the ski work together to deliver
the best performance. Modern skis have high tech glues, materials and
manufacturing methods that better absorb the bad stuff (e.g. vibrations) and
better transmit the good stuff (e.g. what to do). This means you can stay at
home (in the center) instead of having to worry about or manage the tips and
tails of the ski.
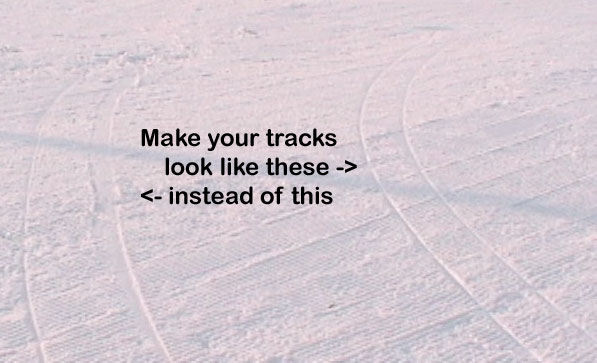
Carving!
These days everyone is ranting and raving about carving. In a carved
turn, the tail of the ski passes through the same point in the snow as the tip
of the ski, leaving a pencil thin track in the snow. When you carve a turn, you
will feel a “G” force. It’s really cool. With straight skis, only giant
slalom and downhill skiers were carving their turns because you needed a lot of
room and a lot of speed. Shape skis have a shorter turn radius than straight
skis. They can carve turns at much slower speeds and shorter distances than
straight skis can. This brings carving into the realm of recreational skiers.
When you carve a turn, you use much less energy than when you skid through a
turn. Skiers on shape skis don’t get as tired as when they used straight skis.
When you carve a turn, you’ve got much greater control over your skis than
when you skid through a turn. This added sense of control and that G force thing
are what makes skiing more fun than it used to be. You don’t have to leave
pencil thin carved tracks on every turn to have fun. The less you skid your
skis, the more you “zip” you will feel. Be careful though, when you carve
you will be moving faster side to side and completing your turns more up the
hill than what you are used to. You need to make sure that you give yourself
extra room to avoid other skiers and the sides of the trails.
Exercises
The following exercises will help you “figure out” shape skis a
lot quicker. Although the last column in the grid is intended for instructors,
if you’re learning on your own, you’ll find a few “advanced” tips in
that column. The exercises are presented in a suggested order, but you can skip
around or even skip the first, third and fifth one. Most of the exercises should
be very easy to do. Leg Lock is harder than it seems, but it’s not a big deal
if you can’t “weld” your feet together. The Flamingo Turns exercise is the
hardest. This could take a lot of time to master.
| Title | What to do | What to Check | Goal | Safety Concerns | Instructor Tips |
| First Run | Before you change anything, just take a run and ski the same way you used to ski. | Make a mental note of things that feel weird. Do the skis seem to have a mind of their own? Do the tips chatter? Do the tails wash out? | Get used to the shorter ski length. Build a laundry list of things to work on. | Keep the speed down. Just make it a warm up run. Be more aware of the side to side space you need coming down the trail. | Make sure the laundry list is taken care of after all the five things are incorporated. Try to hit different snow conditions. |
| Carve to a stop
|
Traverse across the hill. Turn up into the hill only by tipping your boots/rolling your ankles into the hill. Do not turn your feet at all. Turn uphill until you come to a stop. | Make sure that your ski tracks are two pencil thin lines. | Stop guiding the skis by turning your feet so much. Develop trust that the ski will turn itself. Experiment with a wider stance. Learn what carving feels like. | Make sure you do not interfere with skiers coming down the trail before you start across. Skiers are not expecting you to turn uphill. You need more room than you think. | Watch out for a narrow stance width hindering edging. Make it a game to see how far up the hill you can go. Look for consistent stance width through the turn. Gradually increase the steepness of the traverse and width of the stance. |
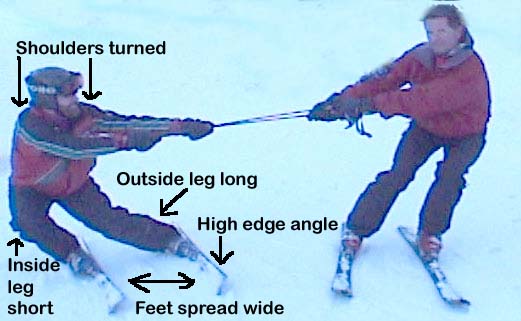
| Tug of War
|
Get a buddy to stand downhill from you. Take your poles off and put them both together. Give one end to your bud and you hold the other end. Stand with your feet close together and your skis as flat as you can make them without sliding down the hill. Have your bud try to pull down the hill while you pull back. Be careful, you will lose. Next try standing with your feet about shoulder width apart, bend your knees and roll them into the hill and square your shoulders to your bud. You should be able to easily pull your bud uphill. | Make sure that your shoulders are square to the fall line, your feet are separated and your knees are bent. Can your buddy see your ski bottoms? Feel the difference in power between a closed stance and a wide stance. | Understand why you need a wider stance. Get experience with the feel of the G force power of a carved turn. | Apply force gradually; be careful not to drop your buddy or pull them off their skis. Be careful about the ski pole tips (point them at the more experienced person). | Watch out for pulling with arm strength instead of using leverage from the stance. See if you can touch your butt to the snow and then stand back up. |
| Edge Me Not | Find a steeper green or easy blue run where you can ski straight for long enough to exceed 20-30 MPH. Keep both of your skis flat on the snow and go straight downhill until your ski tips start to wobble. | The skis have to be perfectly flat on the snow. Note the difference between drift (following terrain) and change of direction from edging. | Start to learn the skis “negative feedback” vocabulary. Be able to tell the difference between feedback and poor ski performance. | Please bail out if you get too close to people. Turn and stop as soon as you feel the wobble start. | Try to wash out turns (pressuring the tails on a low edge angle at the end of a turn) |
| Flamingo Turns
|
From a traverse, initiate a turn down the hill by picking up the downhill (what will be the new inside ski) ski tail first while leaving the tip on the snow and pressured, then tilting the ski onto the new edge. Hold the tail off the snow at least until you are going directly down the hill. | You know you’ve got it when the outside ski feels like it is turning without you thinking about it. | Learn to add forward movement to the tipping for turn initiation. | Try this on easy terrain first. If you have trouble picking up the tail of the new inside ski, first practice lifting the tail of the up hill ski and then picking up the inside tail after the new turn has started. | Fix back seaters with tapping the uphill ski tip first. Try “one ski” skiing with both skis on snow, but 99% of weight on the outside ski (imaginary flamingo). Center of mass has to move across the ski to start the turn! |
| Leg Lock | Try to ski with your legs and feet as close together as possible. | You’ve got it if you can feel your tips or tails make contact with each other. | Learn more of the negative feedback vocabulary. Feel why a wider stance is more efficient than a narrower stance. | This exercise tests your balance skills. If you’ve got balance issues, limit how close you try to get your feet. | Watch out for legs together but feet apart. It’s possible to look good while doing this. |
Copyright
2006
Rusty
Carr All Rights Reserved
Home