![]()
How to use V1 for Snow Sports
|
|
How to use V1 for Snow Sports |
Introduction
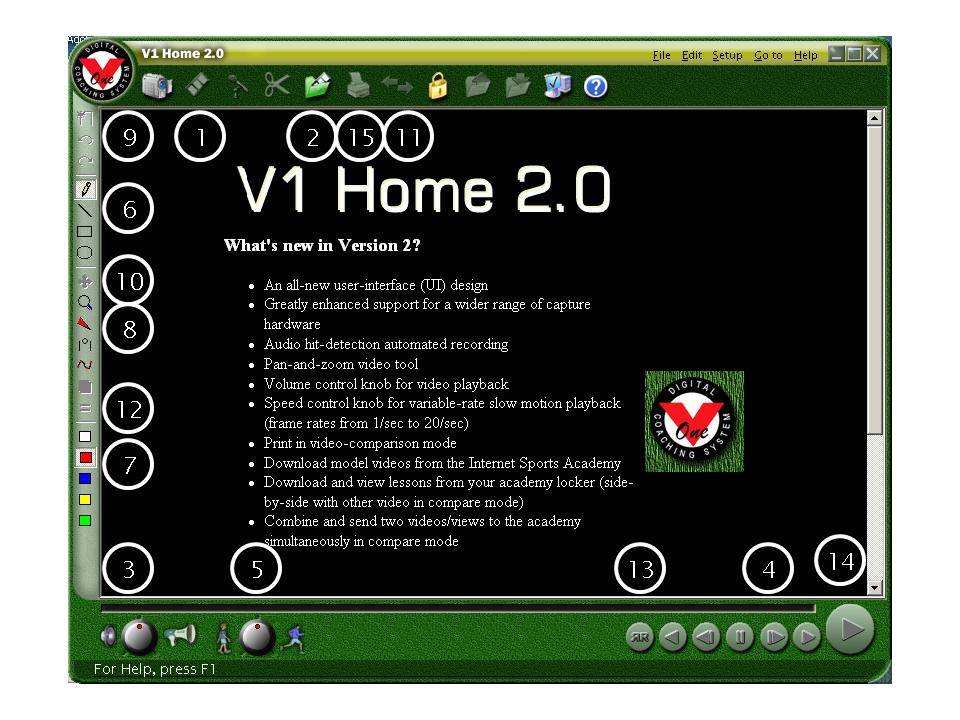
If you have any experience using a computer, learning how to use the V1 software to perform movement analysis for skiing or snowboarding is easy. If you’ve got any doubts, this tutorial will show you how to do it. If you already feel comfortable with the basics, this tutorial also includes some how to tips that took a little work to figure out. We start with a map of the V1 user interface. The circled numbers point to the user interface features. If you hold your mouse over one of the icons for a couple of seconds a label identifying the icon will appear below your mouse cursor and descriptive text will appear at the bottom of the window. These labels are used for reference throughout the tutorial. There are several icons that are not referenced in this tutorial. Most of those are designed for golf analysis and are not useful for snow sports analysis. The purpose of this tutorial is not teach you what you should do for movement analysis. The focus is to teach you what the software is capable of and how to make the software work for ski or snowboard movement analysis.
1) Live Video and Record – Digitizing video from your camcorder
You can’t analyze someone until you get the video onto the computer. You basically have got 2 ways to do this:
a) Using the software that came with your computer or video digitizing hardware.
b) Using the V1software or
If you have Windows XP, the digitizing software will probably automatically start when you connect your camcorder and turn it on. If so, you’ll probably want to record your video clips this way.
If not, start by clicking the Live Video icon (the video camera picture). If your camcorder is in play mode, you will see the video appear on your computer. Once you get to the desired section, click on the Record icon (the film picture). Once you’ve started recording, the Record icon switches to a Stop Sign. Clicking the Stop Sign stops recording and brings up a save dialog where you can name your video clip. This will save your video clip as a standard Windows file. In the standard save dialog, you may want to create a new folder help keep your video clips organized. You’ll definitely want to use a different name than the default “newvideo_1.avi” filename.
If you don’t have a firewire or USB interface between your video camera and the computer, you don’t need to record the audio on your clip. You can if you want to, but it won’t help your movement analysis.
2) Open – Opening a video file on your computer
If you’ve recorded your video using V1, you won’t need to do this step right now, but you might need it later. Although V1 will record and save videos only using the “AVI” format, if you use your own recording capability, your video file might be in a different format. V1 can open many different video formats (e.g. mpeg, wmv). Just click on the folder icon and you’ll be using a standard Windows open file dialog box.
3) The video position slider – Controlling the position of the video clip and watching short segments of the clip
The position slider is very useful for quickly moving between different positions within the clip. When the mouse is over the slider “handle button” the cursor will change from an arrow into a hand. Click the mouse on the slider and hold the mouse button down while dragging the slider left or right. With a little practice you can get very good at using the position slider to play short segments of the clip and varying slow motion speeds much more effectively than using the VCR controls. This helps tremendously when you’ve found a spot where “something”is happening, but you need to watch it a few times to determine what is going on. You can also use this capability to train your eyes to see things in slow motion, and then train your eyes to see it faster and faster until you can spot the same thing at full speed. If you have a mouse with “scrolling” wheel on it, you can get almost the same short segment slow motion playback control. Play with it and see which way works better for you.
4) VCR controls – Using slow motion and frame by frame positioning
If you can operate a VCR, these controls should be easy. The icon with the two vertical lines is the Pause button (it also doubles as the stop button). The right arrow next to it is the frame advance. The next right arrow is the slow motion. The big right arrow is “play at normal speed”.
5) The jog shuttle dial – Controlling the slow motion speed
Sometimes slow motion is too slow or too fast. The jog shuttle control (the button on the right with the red dot) controls how fast slow motion plays. Speed up slow motion by clicking on this control and holding the mouse button down while you “spin” the knob to the right.
6) Lines – Using the drawing tools to check alignment
The straight line tool is useful for checking alignment of the hands and shoulders. Most pros can see whether the hands are level and how high they are held. But drawing a line over them just seems to make you understand it better. To draw a line on the screen, start by pausing your video and then clicking the Lines tool icon. Hold the mouse over the desired starting point of the line, then click and drag to the ending point. Be careful, because more clicks and drags draws more lines.
One of the more common problems in advanced skiing involves the shoulders not matching the pitch of the slope. This can get a little tricky depending on the camera angle relative to the skier, but what you’re looking for is the point in time when the skier is traveling across the fall line. If the uphill shoulder is lower than the downhill shoulder, drawing a line across the shoulder blades and another along the slope pitch will highlight the difference dramatically.
While we’re here, the pencil tool is the only way to write words over the screen. It’s crude to write with a mouse, but it is possible. If you’re creative you may also find a use for the box and circle tools.
7) Colors – Selecting colors for the drawing tools
If you want your lines to have different meanings, you can change the colors. Just click on the desired color prior to drawing your line/
8) Wedge – Measuring angles
The wedge tool is really useful for measuring angulation versus inclination (e.g. banking), but it’s a little weird. You start by clicking on the wedge icon (the red thing). Next, you click on the middle of the angle you want to measure. For skiers, this should be the middle of the hips/waist just below the belly button. For riders, you can also measure from the knees or ankles. After clicking at the midpoint, V1 will draw two intersecting lines with a white dot on the end of each line and show an angle measurement. Click and drag each dot to the end point of what’s being measured. For skiers, one line goes to the center of the chin and the other goes to the center spot in between the feet. If it’s a straight line (180 degrees), then you have a totally banked turn. If the number is in the 140 range, you’ve got some heavy duty angulation going on. With practice, you can get your measurements to be consistent within 1-2 degrees. After that if you see a 3-4 degree difference in angulation, you can tell if someone has made progress or needs some work.
You’d think that you could this to measure the angle of the ski/snow contact. Unfortunately it’s just too hard to do because the skis are so small in the picture and the constantly changing reference points make precise measurement difficult. It might be possible for skiers if the camera operator zooms in on the skis. It is sometimes possible for riders without zooming in. You can see the edge angle on the video, it’s just hard to measure it accurately.
9) Clear/undo/redo – Undoing the drawing tools
When you’re first getting used to drawing lines and measuring angles, you’ll need to draw them a couple of times to get them just right. The Undo icon (the curved line pointing to the left) will erase the last drawing. The Clear icon (the rectangle with the yellow star in the corner) will erase all lines drawn on the screen.
10) Magnify – Getting a closer look at fine detail
See that magnifying glass icon? Click on it, then click and hold over a piece of your paused video. The area under your mouse cursor is blown up in size and shown in a mini window until you release the mouse button. This is real helpful to see exactly where snow starts flying out from under the edge or if those “parallel” skis are really in a tiny wedge.
11) Split screen compare – Playing a reference clip alongside your analysis clip
Clicking the icon with the two arrows causes the screen to split into two panes. When you do this, the same video will appear in both panes. If you click the open video icon, you can bring up a reference video in one of the panes.
12) Lock Video – Synchronizing two clips together
If you’re using the split screen capability, you’ll want to manually position each video so that they are at the same point in the turn. If you click the lock video icon, the slow motion and frame controls in either pane control both videos so you can see the same movements in each pane, or more importantly, the differences in the movements. Note that the “play” capability is not enabled when the videos are locked.
You can make slight adjustments in one video relative to another by using the mouse wheel (if you have one) while the cursor is positioned over the pane. So if the main video turns and the reference video turns are slightly different, you can catch one up to the other without having to resynch.
The split screen mode clips a little off the left and right sides of the screen. If your skier goes off the screen in split screen mode, you can use the pan_zoom icon(it’s the red cross left of number 10 on the diagram) to bring the skier back onto the screen. Click on the cross, and then click on the pane to move and drag the window left or right within the pane.
13) RR – Digitally flipping your video
This capability is useful to make a left turn look like a right turn or to make a goofy snowboarder look normal. This makes sense when you are using the split screen compare feature. For riders this means you don’t have to have one set of reference videos for goofies and another for normal riders. For skiers, the digital flip capability allows you to compare right and left turns for the same skier. This is a really powerful capability.
14) The frame counter – Measuring turn size
The frame counter is in the lower right corner of the V1 window. It can be very useful when planning an analysis session to note the exact point of interest by writing down the frame number. One way to get some order to your reference clips is to measure the turn size by the number of frames in between turns. By noting the frame number at the point of a turn when the pole touch is exactly vertical and subtracting that from the frame number at the same point in the next turn in the same direction, you can get a turn size number that works well for split screen comparisons.
15) Print - Printing a single frame
Typically, the quality of single frame does not make for a very good photo. But if you really want to do this, just click on the Print icon (printer picture). A printed single frame photo can be helpful if you’ve drawn lines or measured angles.
If you want to use the still frame image in another document, just use ALT+print screen to capture a copy of the V1 software window. Then you can start another program (e.g. Wordpad or a picture editing program) and Paste the picture into it. If you’re lazy you can just print the picture with the V1 software stuff around it. If you use a picture editing program you can just select the picture and blank out the V1 stuff before printing.
Summary
That was not too hard, was it? You’ve learned how to record and open videos, control the slow motion, draw lines and measure angles and use the split screen comparison. You’re now ready to do movement analysis for skiers and riders using the V1 computer software. Soon you’ll be shaking your head every time you see one of those old fogeys trying to analyze video on a VCR.
Copyright 2004
Rusty
Carr All Rights Reserved
Home | Back to the main video
analysis page